
Behind-the-Photo: Eclipse Over Washington
Yesterday I shared a remarkable experience with millions of Americans... I joined them in looking up at the sun and enjoying a breathtaking display of the 2017 solar eclipse. During the eclipse, I made a series of images that were later merged into the following photograph (Buy a copy):

The final composite photograph of the August 2017 solar eclipse over the Jefferson Memorial.
Today I am going to break down that photograph to share insight into the capture... part of my process to decelerate from the excitement of seeing the eclipse!
PLANNING THE SHOT
The eclipse came as no surprise - unless you have had your head buried in the sand, you probably knew for weeks (or months) that it was coming. While I knew the eclipse was coming far in advance, it was only in the last three weeks that I started to really plan my photograph.
Unlike many other photos, this is a 'one time only' shot. The next eclipse that would cover the Washington, DC area won't be for at least seven years, and that will no doubt look different from this one. Where the sun will set again tomorrow, offering another chance to re-do a sunset image, the moon and sun won't repeat this alignment every day. One chance. Had to be prepared.
NASA compiled a number of great resources, including some interactive maps that let me calculate the exact time the sun and moon would position themselves over Washington, DC. Using that map, I determined the maximum eclipse coverage over my area would be around 2:45pm EST.

A screenshot of the NASA interactive map, where I could determine the time of the eclipse over Washington, DC.
With the time and date of the eclipse known, I went to one of my favorite apps for planning shots - the Photographers Ephemeris ("TPE"). The TPE app is wonderful because it lets you place a pushpin anywhere in the world and adjust the time and date to see where the sun and moon will align relative to that location. I normally use this app to plan sunrise and sunset shots because I can determine the exact location of the sun rise/set in advance and position myself and my camera for that event.
This was the first time I'd used TPE to calculate a photograph at mid-day, but the app responded beautifully. I changed the date to 21 August 2017 around 2:45pm EST and looked at the alignment of the sun and moon to find a location in the DC area that would offer a nice alignment. Many people would photograph the sun that day, so I wanted my final image to include a foreground element that was clearly "DC" - something that gave context and location to the sun images I would also capture.
A quick look at the TPE app and I found my location.... there was almost perfect alignment between the sun, moon, and Jefferson Memorial. Shooting across the Tidal Basin would offer a wonderful alignment for the elements I wanted in my final composition.

A screenshot from the Photographers Ephemeris app, showing the alignment of the sun, moon, and Jefferson Memorial. In the bottom right corner, the app also displayed the lunar coverage of the sun in a small animation, providing exact information for me to use in planning the shot.
I started to imagine the image in my head - a spectacular composite showing several stages of the solar eclipse staged over the Jefferson Memorial and Tidal Basin.... I may not get totality in DC, but I would have a chance to make a beautiful image anyway!
At this point I had a mental construct of the final product, and it was time to deconstruct the image into its individual elements to plan. The first step was to calculate if it would be possible to get all of the elements in the scene in the camera at the same time, or if I would need to shoot everything as individual elements and merge it later. I suspected it would need to be a composite, but still wanted to do the math to be sure.
Based on the information I had, I put together the following sketch:
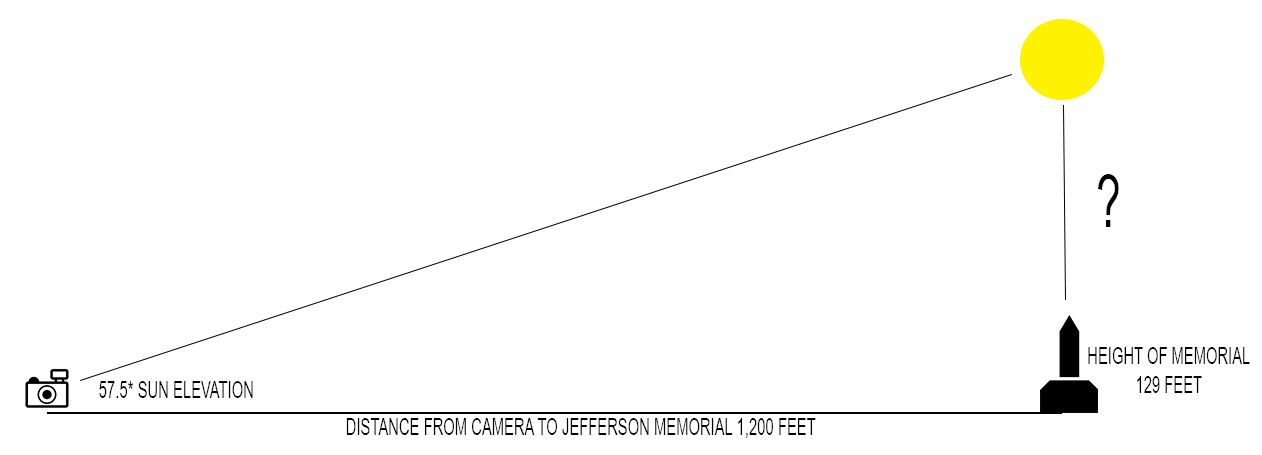
This sketch depicts the information I had - the relative sun angle above the horizon (57.5 degrees), my calculated distance from where I would stand along the Tidal Basin to the Jefferson Memorial (1,200 ft) and the height of the Jefferson Memorial (129 ft). From there, I needed to calculate the height of the sun over the memorial.
Ouch.
It's been awhile since I did geometry, but Google is a great resource for those of us who have forgotten how to do math! I calculated a height of 1,754 ft from the top of the monument to the sun, and my sister, who also happens to be a high school math teacher, confirmed my work. Phew.
After putting down my calculator, it was clear I would have to shoot this as a composite - each element would be a separate image and I would merge them all in Photoshop to create the product I envisioned.
THE EQUIPMENT
With my plan in hand, it was time to get the equipment needed to create my image. Through my math and mental deconstruction of the final image I wanted, I determined there were two different elements I would need to photograph: 1) The Jefferson Memorial and 2) The stages of the solar eclipse.
Those two elements would require completely different equipment, so let's look at each one in turn:
The Jefferson Memorial
Normally, this is a very easy photograph. Point camera at memorial and click, right? Not so fast.... I am taking this photograph at 2:45pm remember. The sky will be a light blue, there will be harsh light and no bright colors. A yellow sun on a baby blue sky will look....out of place. The solar eclipse is also going to darken the sky, so it would be more appropriate to depict the solar elements on a darker sky. But it's still 2:45pm.
I solved this problem with the help of several neutral density filters, which allowed me to darken the sky and create the impression that it was closer to dusk than it really was. Normally I wouldn't employ this tactic during a mid-day shot.... I would just wait until dusk (no filter replaces the real thing), but I felt like this was an acceptable time to use the filters.
I decided that I would get my shot of the Jefferson Memorial before the solar eclipse show started so that I could be totally focused on the sun during the eclipse.
To get the photograph of the memorial, I used the following equipment:
Leica 24-90mm Vario-Elmar lens
Gitzo Tripod
Acratech ballhead and leveling base
Several stacked neutral density filters and a polarizing filter
The Solar Eclipse
The images of the solar eclipse were the ones I was more nervous about getting correct; I have never shot directly into the sun during mid-day, so I needed to get smart in doing so! Thankfully there is no shortage of websites from astrophotographers who explain their techniques!
The longer the focal length, the better. I have a Canon 400mm f/2.8 lens that has a modified Leica R mount that I got to photograph wildlife with, and figured that would be a perfect choice. Even at 400mm, the sun would be fairly small against the sensor - this really is a time for big glass to shine. So I got a 2x teleconverter - which made this lens the equivalent of an 800mm monster! Normally the teleconverter offers a major loss in light reduction, but I knew that wouldn't be an issue when shooting straight into the sun!
The next thing I needed was a solar filter for my lens to protect it and the camera from the harmful sun. The lens is over 6 inches in diameter, so my best solution was to use a piece of solar film and cut my own filter.
I found a piece of solar film on Amazon and used the shipping box and some gaffers tape to engineer a removable holder for the film to sit in front of the lens.
The following equipment was used for each of the solar shots:
Leica R 2x Teleconverter
Leica R to M adaptor
Leica M to T adaptor
Homemade solar filter
Gitzo tripod with gimbal head

My camera rig pointed up at the sun during the eclipse
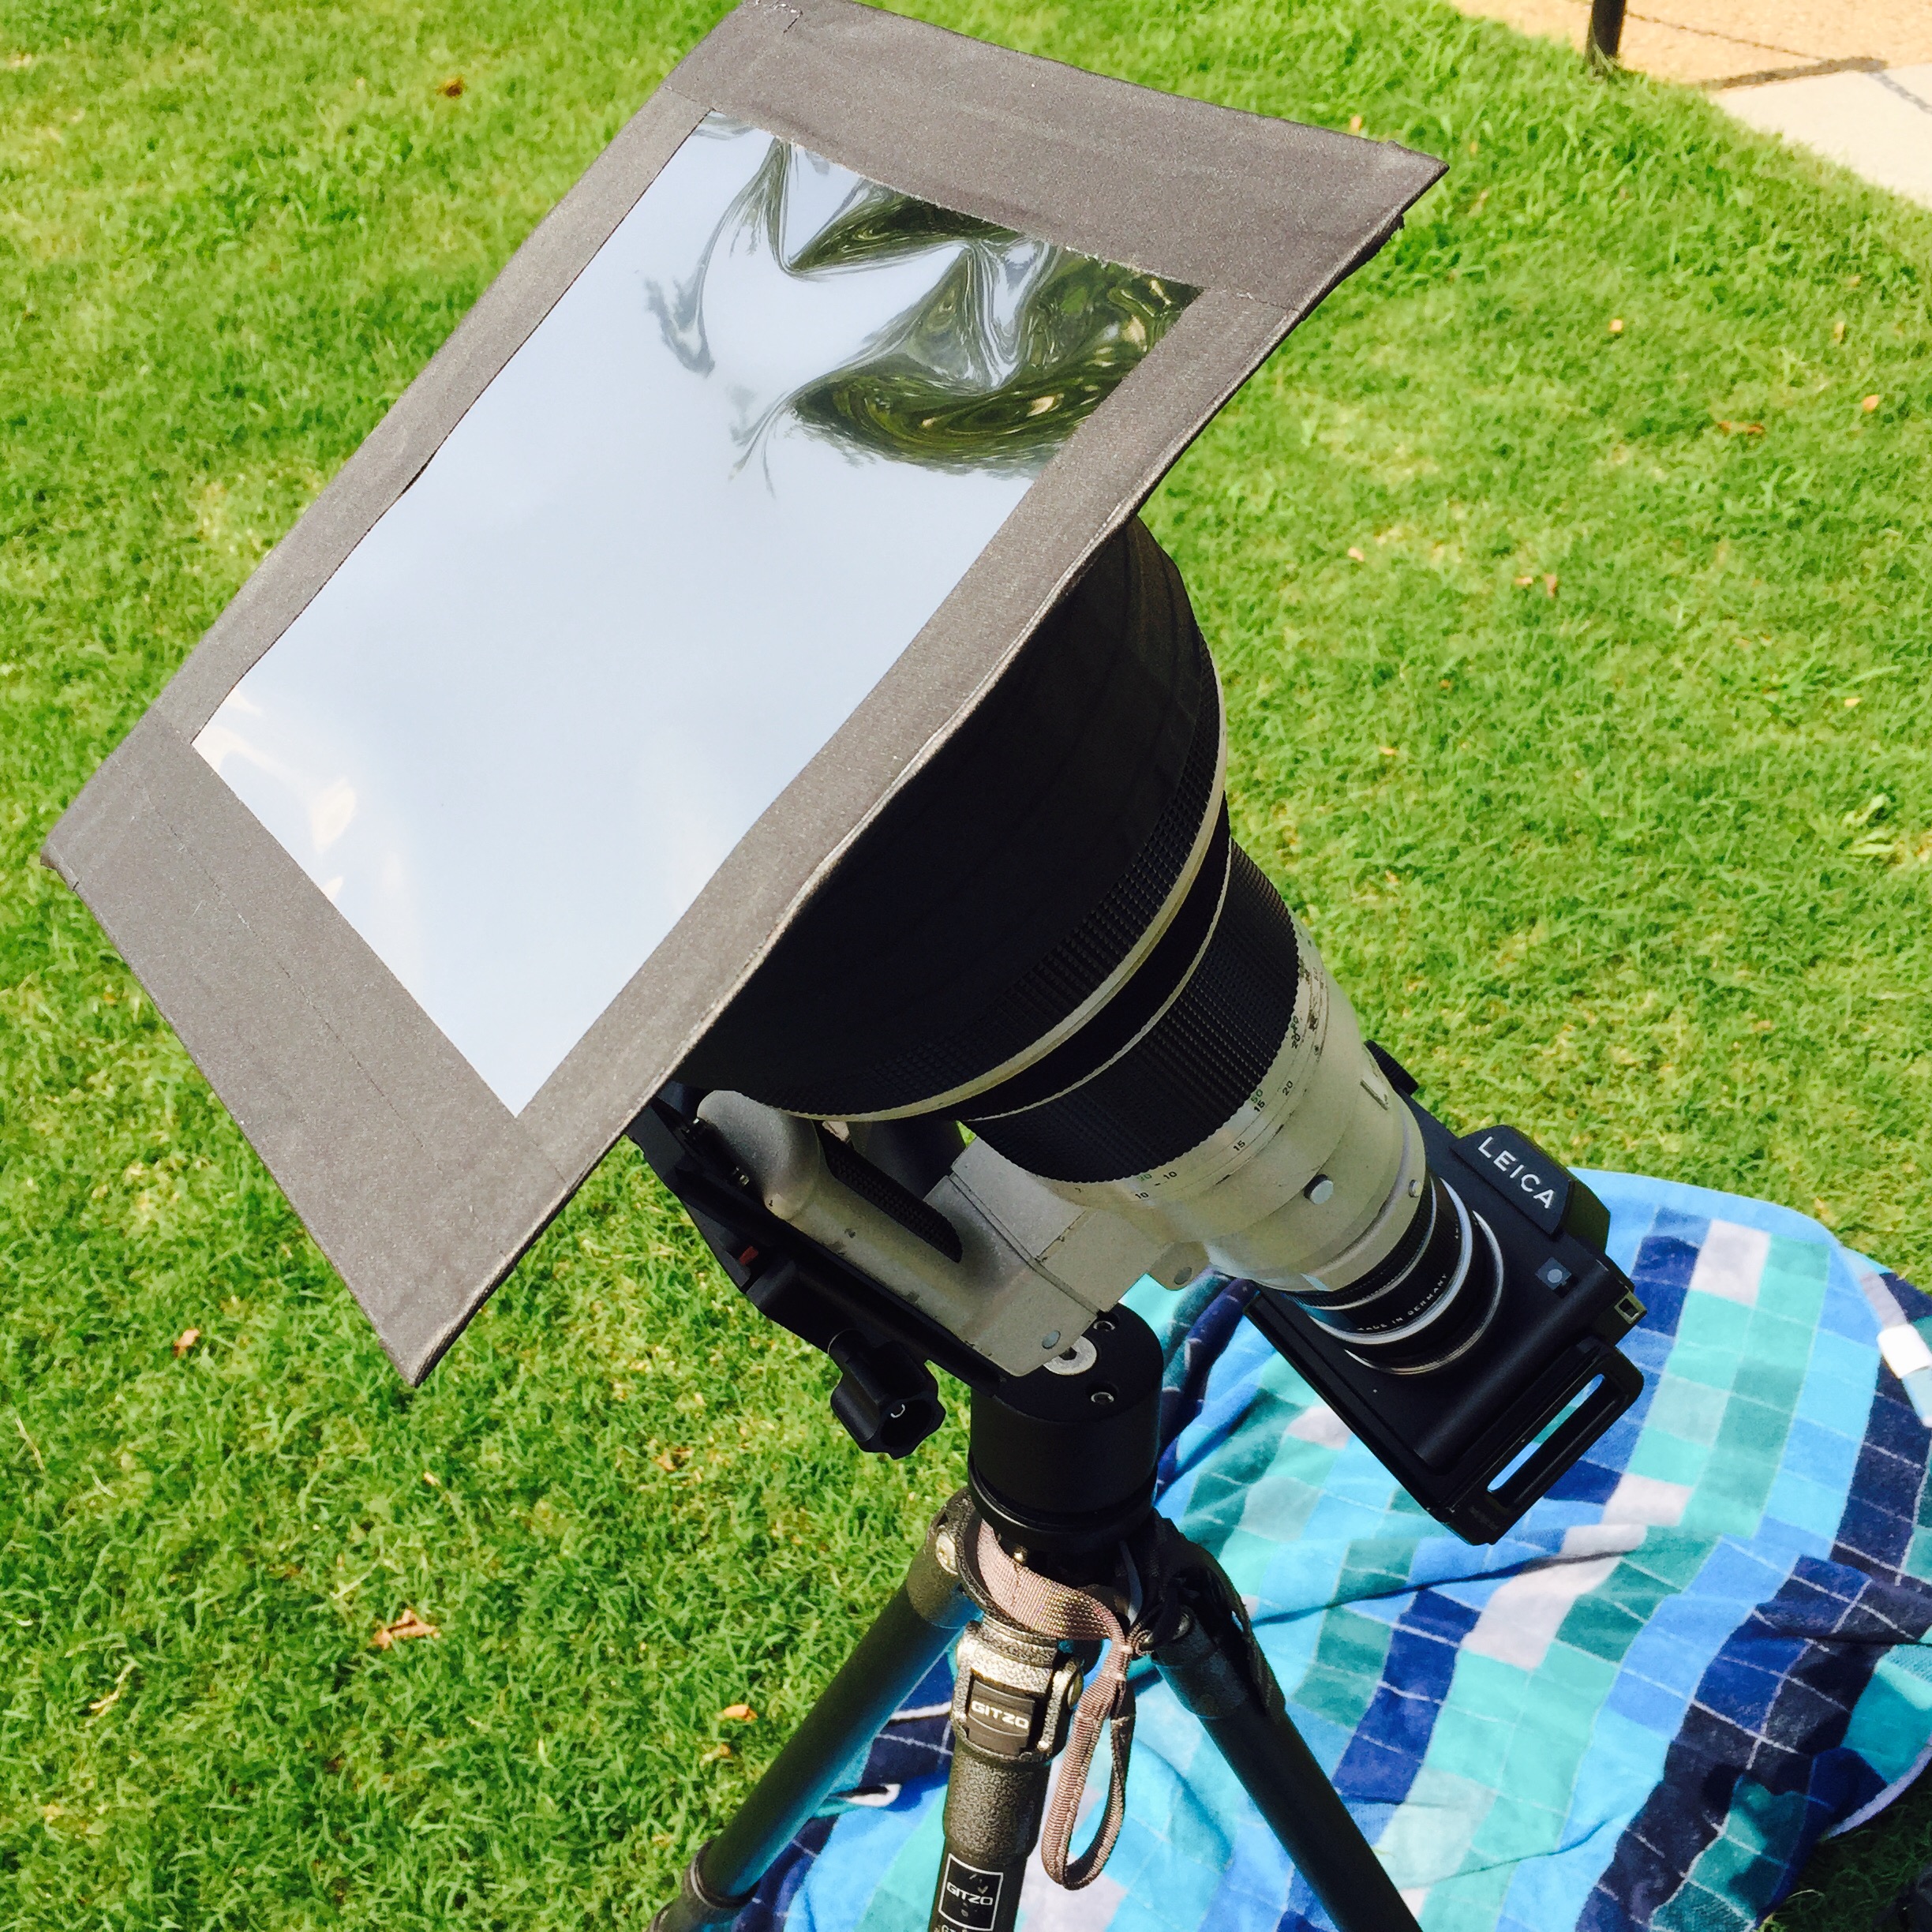
The homemade solar filter mounted to the front of my lens
GETTING THE SHOT(S)
Alas, eclipse day arrived and I packed some gatorade, a beach towel, and my camera gear for an Uber ride to the Tidal Basin. I setup in the grass in the area I'd pre-determined was the right spot for my final shot.
As previously discussed, I planned to shoot the Jefferson Memorial element first, which I did. But the one I ended up using in my final image came last; scattered puffy clouds earlier in the afternoon meant I'd have to contend with a cloudy sky when placing the sun elements in the composite. Since clouds always cover the sun (and never the other way around), I could not place the sun on top of a cloud.... but by the end of the eclipse, the cloud situation had stabilized and I only needed to contend with a few puffy guys over the horizon. A storm cell had moved in, darkening the scene (which I was already going for with my filters), and the uniform grey sky provided a better and more realistic location to place the solar elements.
Because I had planned so meticulously, I was ready the instant the first bit of the moon started to move across the sun. Since I had never photographed the sun, I used these first few moments of eclipse activity to test my settings and focus, ensuring everything was exactly as I wanted.
All of the solar images were shot at an ISO ranging between 100-400 at f/11. Shutter speeds varied based on the amount of sun visible.

Shooting the eclipse at the base of the Tidal Basin.
By the end of the afternoon, rain and storms were starting to move into the area, so I packed my gear and returned home to finish building the final image in Photoshop. I was confident that I had all of the elements needed to build the final image, it was just a matter of assembling them all correctly....
BUILDING THE FINAL IMAGE
The final image would require a composite of several solar elements from various stages of the eclipse overlaid onto my foreground shot of the Jefferson Memorial. In terms of complexity, this is probably the most challenging image I have ever assembled - everything had to look like it was real - the assembly had to be seamless. We've all see poor Photoshop hack jobs - this could not be one!
Is This a FAKE Photo?
Some people will accuse me of making a fake photograph. Sure - the sun never looked like this over the Jefferson Memorial - so in that regard, the photo is a fake. But that's not the point. The point of my artwork is to share an experience. This image is an accurate depiction of my experience - I watched phases of the eclipse move across the sky above the memorial. The photograph I created and shared is an accurate capture of the feeling, emotions, and experience I had. Every element is genuine - there was nothing I created that is not authentic, it is only the combination of those elements that is not genuine.
Assembling the Solar Elements
The photographs of the sun, while the trickiest to get, were actually the easiest to edit. I cropped them all to 1x1 squares (each one in the sensor was the same size since it was a fixed focal length) and adjusted the exposure slightly to correct any over/under exposure. I shot the sun at 10 minute intervals during the early stages, then at 2 minute intervals during the periods of maximum obscuration. The images used in the final shot were taken at the following times (as derived from my in-camera GPS):
21 August 2017, 13:36:10 EDT
21 August 2017, 13:51:35 EDT
21 August 2017, 14:02:50 EDT
21 August 2017, 14:14:39 EDT
21 August 2017, 14:28:56 EDT
21 August 2017, 14:39:30 EDT
These images were not selected for the precise interval separating them (clearly!) but rather because they were good images depicting the various stages of the eclipse. In other words, it was an artistic decision, rather than scientific decision.
Each of the six solar elements that would appear in the final composition were then exported at high resolution to be merged with the foreground shot of the memorial.

One of the six solar elements used in the composite image
The Foreground Image
The photograph of the Jefferson Memorial proved a trickier prospect than initially expected. I thought I might present the whole capture in black and white, but the sun started to look more like the moon when done in black and white. Having the sun remain a brilliant orange was the only way to convey to the viewer that it was actually the sun.
That meant the foreground also needed to be in color. I went through several iterations of how this should look before building one that looked correct. In each iteration, I found the balance between the brightness of the solar elements and the brightness of the background sky to be the most challenging element.
Finally I adjusted (and re-adjusted) until I had a foreground image I was happy with. Below is that image before I cleaned it up in Photoshop and added the solar elements.

The early version of the Jefferson Memorial image that was used to create the final composition
Before adding the solar elements to the composition, I also went through and 'cleaned up' this photograph. There were many dust spots on the sensor, and I didn't like the distraction of the people on the stairs (although I did like the blur of the people on the paddle boats). So I removed each of those things and made slight lighting adjustments to the rest to bring out the best colors across the image.
I brought the final foreground image into Photoshop and then created several layers with each of the solar elements. Using the 'lighten' blend mode, I brought each into the foreground shot and started to build the composite.
I will spare you all of the Photoshop clicks - partially because I don't remember them all and there was a lot of trial and error - but the end result was six solar elements and one background image layered together.
The next step was to adjust the size and location of the solar elements. For this, I drew a hot pink line across the sky, and used the Photoshop ruler and measurement tools to align each sun at equal intervals along that line. The line trick was a lifesaver - it made the alignment so much easier! I also used this to ensure each solar element was sized similarly.

A screenshot from Photoshop of my final image coming together. Notice the pink line I drew the align each of the solar elements as I built the final image.
THE FINAL PRODUCT
After weeks of planning, the final product had come together. The weather cooperated. The equipment all worked. The planning paid off.
I let out a huge sigh of relief when I had finished assembling the final image. Unlike most of my other photographs, I was not confident I would be able to pull this off until the very end, and it was a huge relief to finally celebrate the success. Without a doubt, this was not only the most technically difficult photograph I have ever captured, but it was also the one with the slimmest margin for error; failure to capture the solar elements meant there would be no finished product!
Thank you for taking the time to read this behind-the-photo entry, and leave me a comment if you have any questions about the final image!
You can purchase a copy of this photograph for your home and have it delivered framed and ready to hang!