
Equipment Review: MindShift Gear Rotation 180 Backpack (Initial)
Photographers are gear whores. We love our gadgets and gizmos and are always looking to get that next best thing. I'm no exception - I own more camera bags than purses!
I've been on a quest for a great photographer backpack. Normally, when going on a long hike, I'll pack my gear into a designed hiking backpack, but these bags don't offer the protection for camera gear that I'd like. Additionally, the design of these bags can make it a real pain to get to your gear in a timely manner and require you to remove the backpack to access the compartments.
I own several camera backpacks, my favorite of which is the Think Tank Shape Shifter. It's a great travel bag and I can carry everything I need for several weeks of shooting. Unfortunately, it's not a great bag to hike with; it lacks a true backpacking frame and has no place for me to hold water while I hike. I've read about plenty of photography-specific backpacks that would solve these problems, but they were either too big for my female frame, or didn't satisfy all of my needs.
A few months ago I heard about a new company called MindShift Gear. They're owned/operated by the same folks who run Think Thank Photo (and I love all the Think Tank products I own), so I was immediately intrigued. They started as a Kickstarter project to build camera bags for hikers and got so much attention that they raised over $100,000 more than their goal! Clearly, there's a demand here that isn't being satisfied by the current marketplace!
The hallmark bag for MindShift Gear is their Rotation 180 Professional bag. What makes this bag so unique is that the belt harness can unclip from the back of your pack and slide to the front while you wear the bag, allowing access to your gear without taking the bag off. At first this seemed too gimmicky. I've never been a big fan of these "12-in-1 swiss army knife style do everything" bags and was pessimistic about how well this contraption would work. I was impressed, however, with the bag's layout and construction, so I decided to check it out at my favorite camera shop, which happens to be a dealer - Ace Photo.
My main goals when looking at the bag were to assess the fit (particularly since it's a bag designed for men and I'm a curvy woman!) and how well this bag rotation thing worked.
I was blown away by the fit - this bag is very similar to my high end backpacking bags in that every strap is adjustable in a zillion points, meaning I could adjust it to fit perfectly. The bag was very comfortable and the shoulder straps didn't lay awkwardly over my female curves (some competitor bags are known for being very unforgiving to busty women). In fact, with a few minutes of tweaking, I had this bag sitting like it was custom built for me, which was surprising since I've got a small 5'6" frame.
The rotation feature stunned me. Although the bag was empty while I played in the store, it moved very smoothly and was a one hand operation to move the belt bag back into place. The clip that holds the bag into the backpack is also operated magnetically, so you only have to get it close for it to snap back into place - very handy for a behind-the-back operation. I actually think this bag may work even better when fully loaded as the weight will help keep the bag in place.
Another important requirement for this bag is that it could accommodate my large format film photography as well as my digital photography. Much as I hate to adjust those padded inserts, this bag can switch between setups with minimal modification to those dividers (see below for load outs).
I purchased the bag and have been adjusting it at home, but haven't had a chance to test it in the field yet. However, I thought I'd share some initial impressions in a blog and update with a video blog in the future after I've put some serious miles on this thing.
I'm a photographer, so let's look at the bag in pictures (apologies in advance for the mediocre product photography- I do better with trees!)

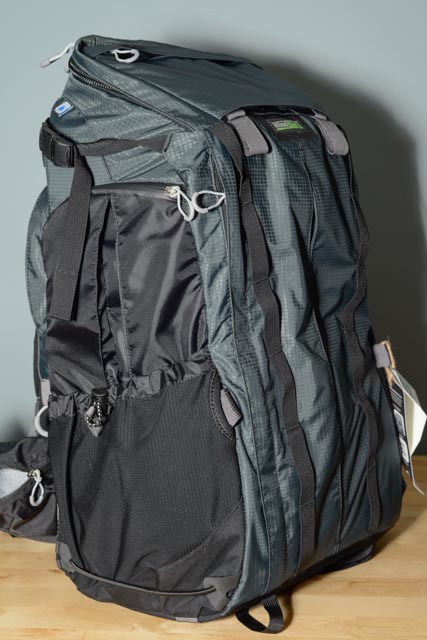
The front (or is it the back?) of the bag. Lots of attachment points for rigging gear. It's made from a heavy duty material that will not tear as it brushes past some twigs. The zippers are also well made and weather stitched to minimize any moisture entering the bag. Of course, it also comes with a rain cover that can be mounted to the bag in the event of serious downpours.

This side has the compartment for holding a hydration bladder (Camelback) and an exit point for the straw. It also has a mesh pocket for a water bottle or other snacks. Both of these are key for long hikes. The waist belt on this side has a small pocket for stashing a granola bar.

The shoulder strap assembly has several adjustment points, allowing for almost custom fit on this bag. In this photo I also have the rigging for the optional tripod mount attached (the carabiners on each shoulder strap). The back pad also has a nice mesh panel to help keep you cool.

This is the side where the magic happens! At the bottom is the clip that magnetically disconnects and allows for access to the rotating camera bag. There's also a large pocket on this side which holds the included rain cover.
The Finer Details

This is what the flap looks like when opened. An elastic cord keeps the flap up and out of the way while you rotate the bag.... this bungee is also adjustable to make the flipping action more pronounced.

A close-up of the clip that secures the flap. It's magnetic, so you only have to get it close for it to re-engage. The thumb cut-out makes it easy to detach one-handed behind your back.

A close-up of the shoulder straps and the rigging mounted on them. This buckle is for the optional tripod mount. There are also elastic pockets on the shoulder straps that can be used to hold a GPS, cell phone, or Snickers bar.

The exit point for the straw from the hydration pocket (bladder not included, but cheap to buy from REI). Notice the big zippers that are less likely to jam up with a little dirt or mud.

Big zipper pulls make it easy to open these zippers, even with bulky gloves on. Sweet!
Another side shot, but on this image you can see where the zipper for the expanding front pocket is located. That pocket is huge - I could easily shove an iPad in there if I felt so compelled.... more likely this is where I'd shove my rain gear so it's separated from the camera equipment.

The back pad opens to allow access to the main compartment, meaning you could theoretically access the main compartment without taking the bag off if you rotated the entire bag to your front. This pocket would be a great place to stash a cleaning cloth or other relatively flat items. I wouldn't shove anything too bulky here as it might stick out on your back funny.
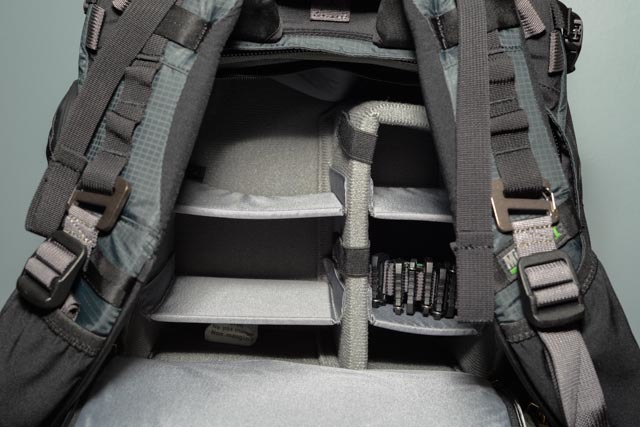
Same view (inside the back pad access point) but this time I'm showing the inside of the optional padded insert. This insert allows you to use the main compartment to store additional camera gear. The other option is to use this for holding some day hiking equipment. When I carry my large format film camera, I'll need this insert, but will probably opt out of it when shooting digital (I say that now....)

The main compartment can also be accessed via a panel on the top. The influence of Think Tank Photo on this design isn't lost- there's a mesh pocket at every turn!

This is what the bag looks like when you've pulled the waist belt out from the backpack. It's the size of a large fanny pack. Although hard to see in this photo, there is an attachment clip here that keeps the waist belt tethered to the backpack so you don't have to stress about dropping this if the waist belt suddenly disconnected (unlikely).

Here's a close-up of the previously mentioned tether. No excuses for dropping something!

The belt pack removed from the rest of the backpack. You could carry this as is on a short hike, but I don't see myself doing much of that. The fact that it can be removed might be useful if your carry on bag was overweight .... sorry TSA, this is TWO bags, not ONE! The front pocket here has another rain cover to protect this when it's not housed within the backpack.

The inside of the belt bag. Notice another mesh pocket an rather expansive cargo area. There are several pockets and modular dividers that will make this a very versatile setup.

MindShift Gear sells a pocket similar to the modular pockets made by Think Tank Photo that can be added to the waist belt. I didn't buy that pocket, but found that my existing Think Tank Photo pockets could be mounted. The pocket needs to be rigged as shown to work properly. Although I don't see myself needing more pockets on this bag, this is handy for allowing me to keep things like binoculars or a teleconverter at hand (or more snacks... nom nom nom)!

Belt pack/waist belt with the extra pocket mounted.

The whole thing mounted back into the backpack (with the extra Think Tank Photo pocket attached).
Load Out Testing - Digital

Although I'd never carry all my lenses on a hike, I loaded them all up just to say "I can"... this is the padded insert for the main compartment with a Nikon 80-400mm lens (left) and Nikon 105mm macro (right). I also have a handful of filters in there.

A more realistic load out in the waist bag. I almost always carry my camera in my hands vs in the bag, so I didn't worry about making space for the D800. I have (from left to right): Nikon 24-70mm, binoculars, 1.4x teleconverter, and Nikon 14-24mm lens. Plenty of space for more filters or a speedlight.
Load Out Testing - Large Format Film

I will have to use the padded insert in the main compartment when I carry my Zone VI large format (4x5) film camera. The camera takes up the majority of the compartment, but I have space on top for a box of film, my light meter and loupe. Note: I would carry the camera body in it's protective wrap, but removed that for the sake of the photo.

The waist bag loaded out for large format film. I have both lenses and film holders in here, but plenty of space for more equipment. I'd probably also put my film changing bag and some extra holders back here.
Extra Accessories

This is the top pocket accessory. This is super handy if you are going on a weekend hike and hoping to use this bag as your primary backpack for the trip. This pocket could hold some critical equipment to make that sort of trip possible. It attaches with 5 quick clips.

A close-up of the clips and their mount on the bag. Very easy to attach or remove.

The pocket attaches to one of the many loops on the front. The straps are long enough that I think I could probably shove a bedroll or something underneath the pocket and use that tension to hold it in place.

With the front pocket in place, the bag looks almost the same as it did without!

This is the tripod cup for those who wish to mount a tripod to their back. This is a gizmo I'll probably never use as intended -I will either mount it to my side using that mesh pocket or use their tripod mounting system to carry it. However, this pocket will be a great place to stash a coat!

The clips for the tripod cup. It starts to get a little busy when you have the tripod cup and the extra top pocket mounted, but not so busy that it's unmanageable.

Accessory straps. In case you haven't mounted your snowboard or Christmas tree, these straps could probably do it. Outside of trying to carry an overnight camping load in this bag, I don't see much use for these straps on day hikes, but maybe I'll be proven wrong.

Half of the tripod mount system. This ring goes around the tripod head and then clips to two carabiners mounted to the shoulder straps. Check out MindShift Gear's website to see how this works - I'll have to get a picture taken when I'm mounted up to help explain this better.
Initial Impressions
So far, I'm very impressed with the bag, but need to take it out before I render a final verdict. The construction is top notch and there's no question this bag will last for a long time. The bag is packed full of little features, a number of which I've failed to mention up to this point (including the fact that the frame design allows it to free stand upright and the tripod accessory is a great arm rest).
I have one very minor concern as I go forward to start using this bag, but it really is minor (I'm digging for issues). When the tripod mounting system is used, it creates alot of straps that dangle in front. I see it as very likely that I'll get caught up in these straps or get them twisted under my shoulder, creating a nuisance when I need to fish them out constantly. Maybe I'll be proven wrong about that, but it's the most glaring flaw I see with an otherwise flaw-free bag.
I'm going to use the bag for a few weeks and will report back with a video blog, so stay tuned for more! I also plan to do a post with the bag outfitted for a weekend camping trip to see how it would fare for a solo overnight hike.
Note that I'm in no way affiliated with any company or product mentioned in this post. I paid retail for my bag and was not asked to review it, but did so because I hadn't seen many women talking about this bag, and our needs can differ. I also hadn't seen a conversation about using this bag with large format film, so hope to add to that discussion. You can buy this bag directly from MindShift Gear or use their website to find a dealer in your area.
Be sure to follow me on Facebook to see my future blog posts about this bag!