
Getting the Most: Basic Techniques for Editing the DJI Phantom Photos
Introduction
Greetings! This article is designed to explain some basic techniques for editing photos from the DJI Phantom series quadcopters to improve the results you get from the camera. Examples seen in this article were taken using a DJI Phantom Vision 2 +, but can apply to other models of the Phantom series. Although this how-to may seem foreboding, it’s really not that hard and with practice, you can do everything described below in a matter of minutes. This guide is designed to help the beginner -someone with little experience in editing but who wants to get the most out of their work. I’ll caveat up front that there are LOTS of other ways to edit your photos and this is by no means the only way, it’s just the way I do it and find works best for me!
About the author: Although I am new to flying the DJI copters and shooting aerial photography with them, I am no stranger to photography or editing my photos.... the techniques applied to edit from the DJI Phantom are almost no different from those used to edit photos from my Nikon dSLR camera. I regularly post a blog with techniques and describing my work, which can be found on my website at www.ScenicTraverse.com; you can also find me on Facebook, YouTube, Twitter, Google + and more - all the links are on the website. My work has been recognized in a variety of forums, most notably on CNN and in Photoshop User Magazine. I am the 2014 winner of the Vincent Versace Award for Photographic Excellence.
YouTube Video
I made a video to accompany this article - and I cover everything below in the video. Be sure to watch it!
Camera Settings
Before we discuss the photos, let’s take a brief look at three settings that can make a big difference in your results:
- Make sure you are shooting in RAW (.DNG files). I will explain more in the next section, but if you shoot in .JPEG, this tutorial will be far less useful. Seriously.
- Set an exposure compensation of -0.3 to start, but play with this number based on your environment. Why? When shooting something with the sky, your camera tries to choose a “correct” exposure based on balancing the bright sky and relatively dark earth. But what is technically a correct exposure is often not an artistically appealing exposure. A negative exposure compensation will make the whole photo a little darker, but will preserve the shadow detail so that it’s not blown out when the camera attempts to compensate for the bright sky. This is not a golden rule and I will often vary the exposure compensation, but it’s a point to consider to improve your results.
- Use the lowest ISO possible when shooting. I always try to use ISO 100, but if I’m shooting a sunset or other darker scene, I’ll need to raise that number. Based on my observations, the DJI Phantom camera has a decent amount of noise at ISO 100 and it only gets worse the higher the ISO. So whenever possible, use the lowest number you can!
The Importance of Shooting in RAW
I cannot overstate the importance of shooting in RAW (.DNG). It’s so important that I have an entire YouTube video dedicated to this topic (http://youtu.be/sPRL2xEr6ok). In short, if you shoot only JPEGs, you rob yourself of valuable image data that you’ll want in editing.
To explain why RAW is so important, let’s take a quick look at how JPEG works. When your camera takes a picture and saves a JPEG, it makes some assumptions about the settings you want based on a pre-programmed model from the manufacturer. So the camera looks at the photo of the tree you just took and says “I think this photo will look best with X contrast, Y sharpening, Z color saturation, etc” based on a programmed algorithm. After making that decision, the camera throws away all of the other data that it collected to take the photo- only saving that which it deems best for the photo. This is why JPEG files are fairly small and are so friendly for email and the internet - they aren’t very deep in terms of color depth or dynamic range.
By comparison, when the camera takes a RAW photo, it makes no assumptions about the contrast, sharpness, color saturation, etc and it saves ALL the data into a much larger proprietary file format. My Nikon camera saves RAW photos as a .NEF, while the DJI Phantom saves them as .DNG. What’s important to note is that RAW isn’t a file type like JPEG, it’s a proprietary format and you need a piece of software that can read that format to edit the RAW file. Instead of inventing their own file format, DJI used the .DNG, which is Adobe’s proprietary format, opening up the ability to edit these files to a variety of pre-existing software.
When you shoot in RAW, you get all of the data and the camera doesn’t try to assume anything for you - which opens up the creative freedom. Don’t be surprised if you compare a RAW and JPEG file side by side and think the RAW looks dull - that’s the point! You make all the decisions about your photograph & your art, not the camera.

Metadata on one of the .JPEG files from the drone. Notice how low the bit depth is compared to the RAW .DNG file below. Also note how vibrant the colors are in the JPEG because the camera choose those settings - and then deleted all the other data!

Now the metadata for the RAW .DNG file - notice the bit depth almost doubles! And while the colors aren't as vibrant, you have all of the data behind the photo, allowing more flexibility and opportunity to edit the photograph, Always shoot in RAW!
Editing Software
There are lots of choices for photographers these days when it comes to editing. For this article and my own personal use, I use the two most common programs for photo editing - Adobe Lightroom and Adobe Photoshop. We often forget that the darkroom was an important step in Ansel Adams’ editing - Photoshop is my digital darkroom. Lightroom is a very popular and affordable option and I highly recommend it, but Photoshop has more advanced features that I use, which has made Photoshop my default choice. Either way, the edit process I will describe below works interchangeably between Lightroom and Adobe Camera RAW (the RAW file processor built into Adobe Photoshop).
Lens Profile Corrections
One of the awesome things about the Adobe software suite is that they offer pre-programmed lens corrections for the DJI Phantoms. The lens on the cameras has a severe fisheye effect which leads to distortions and can be a real pain to correct... Adobe to the rescue! With the pre-programmed lens corrections, I check a box and the software reads the metadata of the file to determine its a DJI camera and then auto corrects all the distortion for me. This is always my first step when editing and this setting can be found under “Lens Profile Corrections” in both Lightroom and Photoshop.

Before using the lens correction: the photograph has a severe fisheye effect that can be hard to correct manually.

By clicking the "enable profile correction" box in Adobe Camera Raw (or in Lightroom, it's the same thing), Adobe recognizes the camera as the DJI Phantom and removes all that distortion.
Removing Chromatic Aberration
Have you ever looked closely at your photos and noticed some things, like trees against a bright sky, have a purple hue and outline? That’s called chromatic aberration. This is less of a problem with high end cameras and lenses, but I’ve noticed it on all the photos from the DJI camera. Again, fixing this is as easy as clicking the box to remove chromatic aberration in Lightroom or Photoshop. This check box is usually found right next to the lens profile corrections and I do it as part of that edit.

Notice how the houses have a purple roof and there is purple grass along the border between the trees and grass - this is called chromatic aberration and is easy to fix.

By just checking the box to remove the chromatic aberration, the purple hue is minimized. You can further tweak this to remove more purple hue by adjusting the sliders.
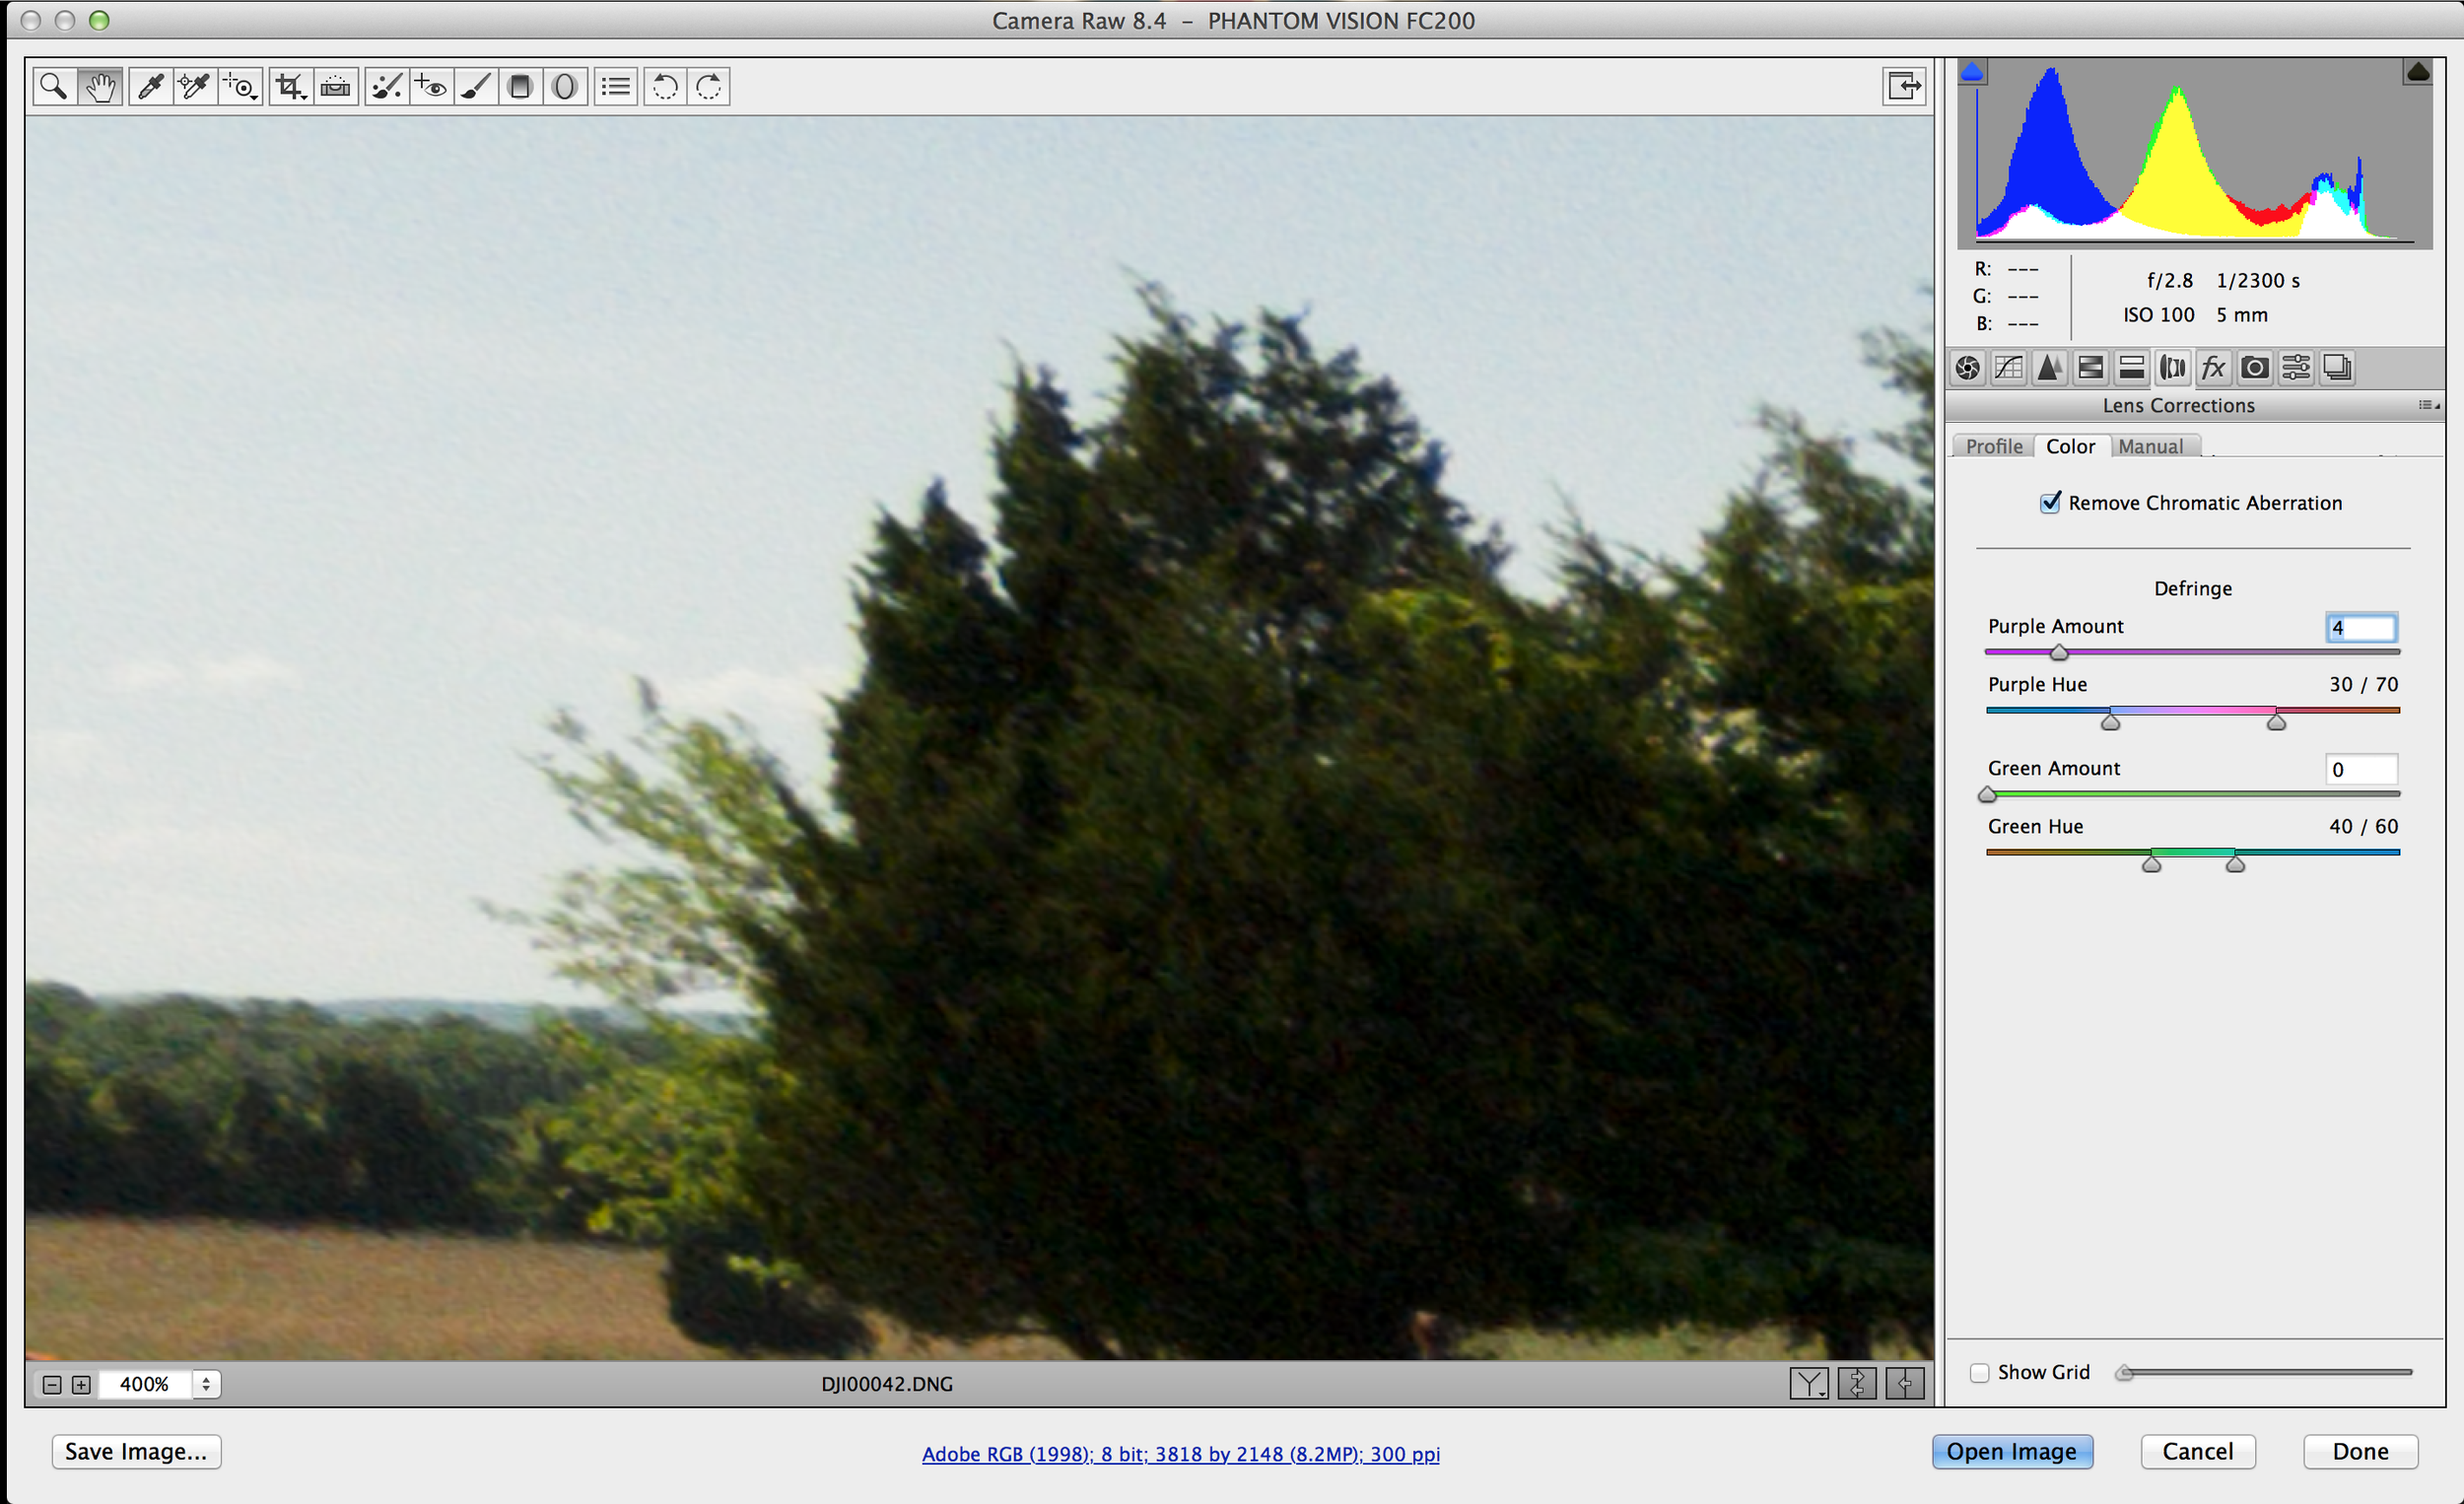
This is the dialogue box in Adobe Camera Raw (its the same in Lightroom) to remove the chromatic aberration. Move the "purple amount" slider to increase the effect.
Cropping
My next step is usually to crop the photo. I always crop after performing a lens profile correction because those corrections often change the way a photo is setup. There are several standard crop sizes like 4x6 or 5x7, but I often use 16x9 because the widescreen look is very popular. Whatever you choose is up to you!
Setting Black and White Points
Now it’s time to get down and dirty with editing. There is a slider for blacks and whites in both Photoshop and Lightroom. The goal with both sliders is to adjust them until you have a little bit of the photo (a few pixels, just a little!) that is pure black and a few that are pure white. Usually the white slider will be pulled right while the black goes left, but that’s not always the case! Although you can have the computer show you the pure blacks and whites in the scene, I just eyeball this based on aesthetics - it’s art after all! When you have your white and black point set properly, you’ll have some pixels that are pure white and pure black, but not too much!

Start by moving the white and black sliders to set the white and black point where you have both pure white and pure black in the image. I just eyeballed it here (using Lightroom).
Adjusting Exposure & Contrast
I never adjust the exposure before the black and whites because moving those sliders can often lighten or darken the whole image. I wish Adobe would program the slides in another order for me because everyone assumes you should start here since it’s at the top, but I disagree! This is another artists choice opportunity - you may not change the exposure at all - but find something you like. While you are here, you can also edit some contrast, but I usually don’t modify that slider very much.

I pulled the exposure down a little because I thought it was too bright after adjusting the white point. There's no science in play - just whatever looks good!
Adjusting Highlights & Shadows
This is my favorite part; it’s the magic sauce. In a scene with a blue sky and trees, you will notice that after you set the black and white point that the sky is very bright and the trees are very dark. This is where we fix that. Grab the highlights slider and pull it down until you have a nice result - sometimes I pull this all the way back down to -100 to get a blue sky. Then grab the shadows slider and pull it up to reveal the details that were too dark in the shadows. It’s incredible stuff, really.

Finally, I pull the shadows and highlights slider to minimize the sheen on the top of the canon while pulling out some detail from inside the canon's wheels These sliders are incredibly powerful!
Clarity & Vibrance
The final step with the sliders is to adjust clarity and vibrance (color intensity). Clarity is essentially sharpness, but we don’t call it that, we call it clarity. I have found the sweet spot on clarity for me is usually around 20. Then grab the vibrance slider and pull that up until you have nice colors; for me it’s usually between 15-20 but it varies by photo. At this point you may ask about some sliders we haven’t touched - yep - I often don’t use all the sliders to edit a photo. These are the ones I use 90% of the time.

The last step to give it a finished look is to play with the clarity and vibrance sliders to improve color contrast. There is too much of both of these sliders - a little goes a long way!
Small Touch-Ups
Done... almost! Using either the spot healing brush in Lightroom or content aware brush in Photoshop, I now go through and remove extra junk from the photo. This could include cars, people, telephone poles, etc. The clone stamp in Photoshop can also be very useful for removing these objects. My rule of thumb is to remove anything that would distract the viewer from the story I’m trying to tell with my photo. The command “edit -> undo” can be your friend if you get too carried away!
Using Plug-Ins
I regularly use a plug-in suite sold by Nik Software (owned by Google) to enhance my photos. Their software is very affordable and includes a great plug-in for black and white conversions (Nik Silver Efex) and for high dynamic range photos (HDR Efex Pro). Although I can do both of these things in Photoshop, I think the plug-ins are a very easy and fast way to get great results. I have used plug-ins from other companies like OnOne Software, but the Nik suite is my go-to for this type of work 99% of the time. In my YouTube video about editing DJI photos, I show a demo of a black and white conversion with this software.

Plug-in software like Nik Silver Efex 2 can make it easy to convert a photograph to black and white or give more dynamic range. These plug-ins work very well and are my favorite for extra post-processing.
Exporting Results
You can’t just click “save” on a RAW file - you have to export it as another file type. I usually use a TIFF file as my “master” which is full resolution with no loss of color and then convert to JPEG for email or use on the internet. In Photoshop you can pre-program actions that will let you save as a TIFF or JPEG with just the click of a button. Voila!
I hope this has helped you get more out of your photos - there’s no “wrong” way to edit a photo and as an artist you are afforded lots of freedom to express yourself. There are lots of great resources online to learn both Photoshop and Lightroom, but I recommend KelbyOne based on my own experiences with their training videos.
If you have questions about any of this content, be sure to shoot me an email by using the contact form on my website. I respond to every email I get!
Safe flying and happy editing!