
Getting Legal: Converting a Jeep Wrangler to European Spec
Mandatory Disclaimer: This blog is written for informational purposes but does not reflect legal advice for modifying your vehicle. Restrictions and requirements constantly change, and it is your responsibility to research and understand those requirements before making any modifications to your vehicle.
Bringing a US-made vehicle to Europe can be an awesome way to explore and travel, but if you plan to register your vehicle in a foreign country, you need to be prepared to make modifications in order to make the vehicle comply with safety laws in that country.
Today we’re documenting what it took to modify our 2019 Jeep JL Wrangler to European spec - specifically to pass the Ministry of Transportation (MOT) inspection process in the United Kingdom. I couldn’t possibly hope to capture every modification needed for every vehicle, so this is really aimed at those of you with Jeep JL Wranglers that are US spec.
Do You Need to Modify Your Vehicle?
Probably yes…. as a general rule of thumb, if you are registering your car in Europe or the UK, you will need to modify it to meet their standards. There are some exceptions for antique vehicles of a certain age. Similarly, if you have imported your vehicle for only a short duration for travel, you may not have to follow all these rules. Do your own research. And don’t forget to get the appropriate car insurance!


What is MOT?
The MOT inspection in the United Kingdom is designed to test that your vehicle adheres to the safety and performance standards needed to operate on roadways in the country. An inspector will test a variety of factors - ranging from sufficient tire tread to cracks in the windshield. Those checks are not dramatically different from what many annual state safety inspections require. Where it is challenging is for those of us who imported a vehicle, because we need to ensure that our vehicle is compliant with all of their safety rules — even those we don’t have back in the USA.
The requirements to pass an MOT are documented online, so you can read them at your leisure. Check them out here.
Common Modifications & Options
Generally speaking, most US cars will only require modifications to lighting systems to be compliant and pass an MOT test — assuming your car is otherwise safe to drive (tire tread limits, etc). There are many garages and auto shops that specialize in making your vehicle UK spec, and if the convenience of this is worthwhile, you can explore that option. Just realize those shops are doing what they have to do to make you legal — and it might involve chopping up some factory wiring or other cosmetically unappealing mods. I have heard stories of shops cutting wire after wire in an attempt to hack the lights into compliance…. up to you if that’s what you want done.
If the option to get legal without hacking at factory wiring appeals to you, then read on!


Good News First
Even though UK spec cars are right hand drive (meaning the steering wheel is located on the right side of the vehicle, compared to the left side found on US cars), you do not need to change the position of the steering wheel to convert a vehicle from US to Euro spec. In fact, depending on your setup, you can make all the modifications needed for only a few hundred dollars.
The other bit of good news is that Jeeps are relatively easy to work on, so you can make a lot of the modifications needed yourself if you are the least bit handy. Everything documented below was done with basic hand tools in a parking area behind our house — no fancy tools, lifts, or garages here. You can avoid the risk of a chop job on your wiring if you elect to do it all yourself.
…And Now the Bad News
As of 2022, a US-spec Jeep Wrangler JL is most likely to need 3-4 modifications done to lighting systems in order to be legal and to pass the MOT inspection. The common “pitfalls” and areas where we are most likely to need modification are as follows:
Rear Fog Light
Amber Turn Signals
Side Marker Signals
Front Fog Lights *
*Depending on your Jeep build
The other bad news? One particular modification is likely to cause some agony and swearing… those amber turn signals. This is because Jeep did not run the same wiring on US and Euro spec vehicles; meaning you cannot just order the Mopar Euro parts and hot swap them… you will need to run some new wiring for that modification.
Ready to dive in? Let’s look at each light modification individually…. starting with the easiest ones to modify.
Front Fog Lights
Depending on how much you’ve modified your vehicle from stock, this may or may not be an issue. The UK requires WHITE front fog lights on all vehicles; most Jeeps will come with this standard from the factory. If you still have the factory fog lights, or even aftermarket fog lights, so long as they are white in color, you’re already set to go.
In our case, we’d swapped out the factory front bumper for the ARB Bondi stubby bumper, which has no fog light mounting points. As such, we also didn’t have the factory wiring harness anymore.
To resolve this, we added a set of SAE- compliant Baja S2 Squadron fog lights to the front bumper, immediately below the bull bar. I purchased a new Mopar fog light wiring harness and spliced the Baja Squadron connectors to it, allowing the fog lights to plug directly into the factory fog light wiring. This was the cleanest way to do the installation and was nearly plug-and-play easy.


Rear Fog Light
It’s safe to say that virtually every US car brought to Europe will be non-compliant with the requirement to have a rear fog light; the good news is that it’s easy to add. In the UK, vehicles are required to have a RED fog light on the rear of the vehicle that is switch activated. It can be the same switch as the front fog lights or a different switch, but it must be red. This also cannot be a reflector, it needs to be an actual light source.
Rear fog lights are used so that a car can see you from behind in low visibility situations. Because of its location on the vehicle, it should be differentiated from the normal red brake lights. There are also specific rules about when you can and cannot use this light, so make sure you’ve read up!
In our case, we added a red Baja Designs Squadron S2 light to the rear of the tailgate, right next to the receiver hitch mount. This low-profile light does not protrude too far down, so it shouldn’t be too exposed to the trail when we’re off road.
In the US we only have one factory switch for fog lights, and I could have wired the light into the same harness as the front lights. However, I thought this light might come in handy as a camping scene light one day, so I opted to wire it directly to the battery and added a small switch discretely below the steering wheel. I could have used one of the factory aux switches that came with the Jeep JL, but I don’t have any spare circuits there. All told, it was the most straightforward of all the light modifications we had to make because it is no different than adding any other accessory off-road light.


And now things get more tricky…
Side Marker Lights
In Europe you are required to have side marker lights — otherwise known as turn signals on the side of your vehicle. Wranglers sold in Europe have those integrated into their side mirrors, so it would first seem like the easiest solution would be to swap a Mopar US part for a Mopar UK part. Unfortunately, in a cost-saving effort, Jeep does not have the same wiring for Euro and US Jeeps, so the parts are not plug-and-play compatible.
Because of the lack of factory wiring, installing a side turn signal is going to require pulling that turn indicator information from the front turn signal wiring located behind the front fenders. Plan well, because you’re probably going to need to tap into this wiring again for the next step, so it makes sense to do this all at once!
There are a bunch of options for side indicator lights on the market, including some cheap-o eBay lights and aftermarket side mirrors. I ruled out the side mirrors pretty quickly after researching how much electronics and wiring goes into them for things like the blind spot indicators. I decided the easiest and cleanest solution was to install a set of Oracle Sidetrack lights behind the front fenders. These lights come pre-wired to make installation a breeze and meet the requirements for a side marker light. And as a bonus, not only do these satisfy the need for a side marker light, but they also offer a white scene light that shines onto the ground near the doors. This courtesy light is activated by opening the doors and unlocking the car, making it a nice feature when you approach the car at night. I suspect we’ll find this very useful when camping.
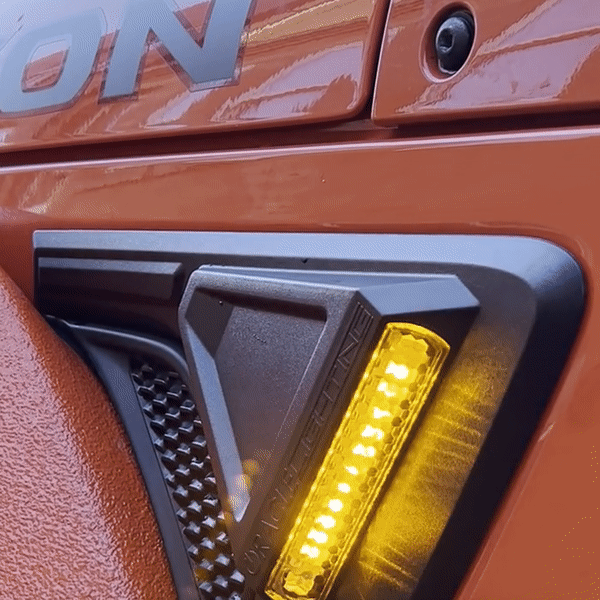
The turn signal from the Oracle Sidetrack lighting kit
Wiring these was a simple enough modification, but again, it’s best done in conjunction with the amber turn signals we’ll discuss in the next section. You will need to gain access to the inner fender area behind the passenger and driver’s side wheel wells. Using a T-Tap you will need to tap into the factory turn signal indicator and then run another wire through the firewall to connect to the light in the wheel well. There are lots of videos online with walkthroughs for the installation, so I won’t detail it here, other than to say it was pretty easy. The biggest considerations for installation:
Have enough plastic rivets and rivet tool to make removal and re-installation of the inner fender liners easy
Access to the passenger-side foot well light can be tricky as access through the firewall on the passenger side isn’t super easy (at least compared to the grommet on the driver’s side). The fix is to run a jumper wire from the white passenger side wire to the white wire on the driver’s side and only run one through the firewall. There are YouTube videos explaining how to do this.
Finally, ensure you have a good plastic trim removal tool to pry back the trim on the edge of the fender while protecting the paint.
There are a lot of other options available to satisfy the need for side marker lights, and it is possible to install the Mopar Euro mirrors with the side lights if you’re willing to run the extra wiring needed for it. But for the price and ease of install, it might be hard to beat what Oracle has to offer.


Amber Turn Signals
Without question, this is the modification that is the most painful. The UK requires the rear turn signals to be amber, but the US Jeeps have red rear turn signals. (More precisely, the brake light on a US Jeep JL just flashes to indicate a turn — there isn’t a separate light). At first I thought this would be an easy enough fix — buy the Euro tail lights from Mopar and hot-swap them… right? Nope. Turns out that Jeep doesn’t run the same wiring in Euro and US-spec Jeep Wranglers, so you cannot just swap one set of tail lights for another.
On a US-spec Jeep Wrangler JL, the signal for turning is not independently wired to each light. Instead, the tail lights flash a red light based on a modulation signal sent down the wire that controls the brake light. In other words, there isn’t a wire in the rear turn signals that takes an input from your turn indicator.
So to get an amber turn signal you’ll have to add one.
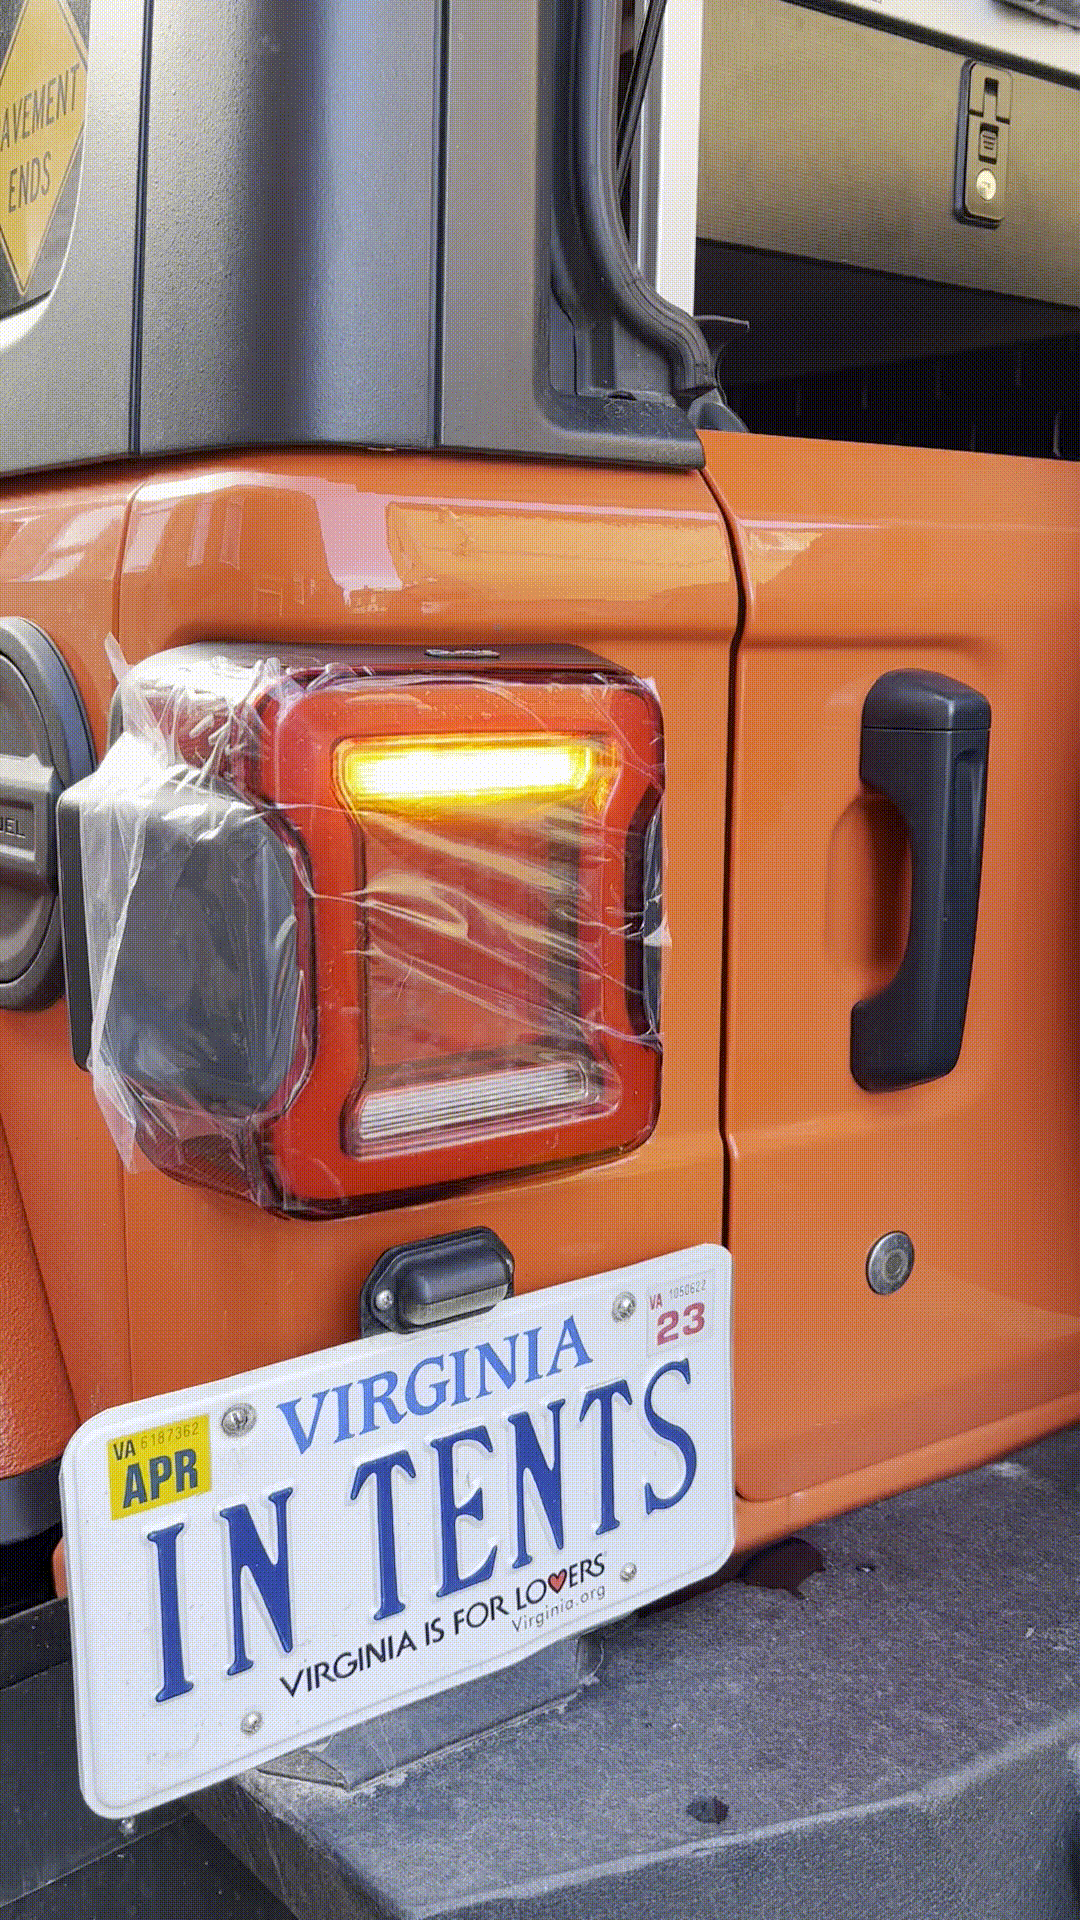
Amber turn signals added from the Quake LED Sequential LED Tail Light Kit
The only place to pull that signal from is the front turn signals (I researched trying to get it from the tow hitch wiring, but never got a clear answer on the feasibility of that).
I did a ton of research on how to best overcome this challenge. In some cases, saw people hacked up their white reverse lights and added stick-on mini lights in an effort to meet the requirements. These options didn’t appeal to me as they permanently damaged the wiring in the Jeep. I didn’t mind adding wires, but I do mind cutting them, and did not want to have to irreversibly modify the car in order to meet the MOT requirements. After some time researching the options, I found the Quake LED Sequential LED Tail Lights — this kit has everything needed to overcome the amber turn-signal challenge. Specifically, it has an amber light for the turn signals that is controlled by a wire running from the front turn beacons. Although you can buy these lights and plug-and-play them directly as a hot-swap of the old tail lights, in order to get the amber turn signal you MUST use the “light hacker” modification that is included in the kit. This also increases the installation difficulty.


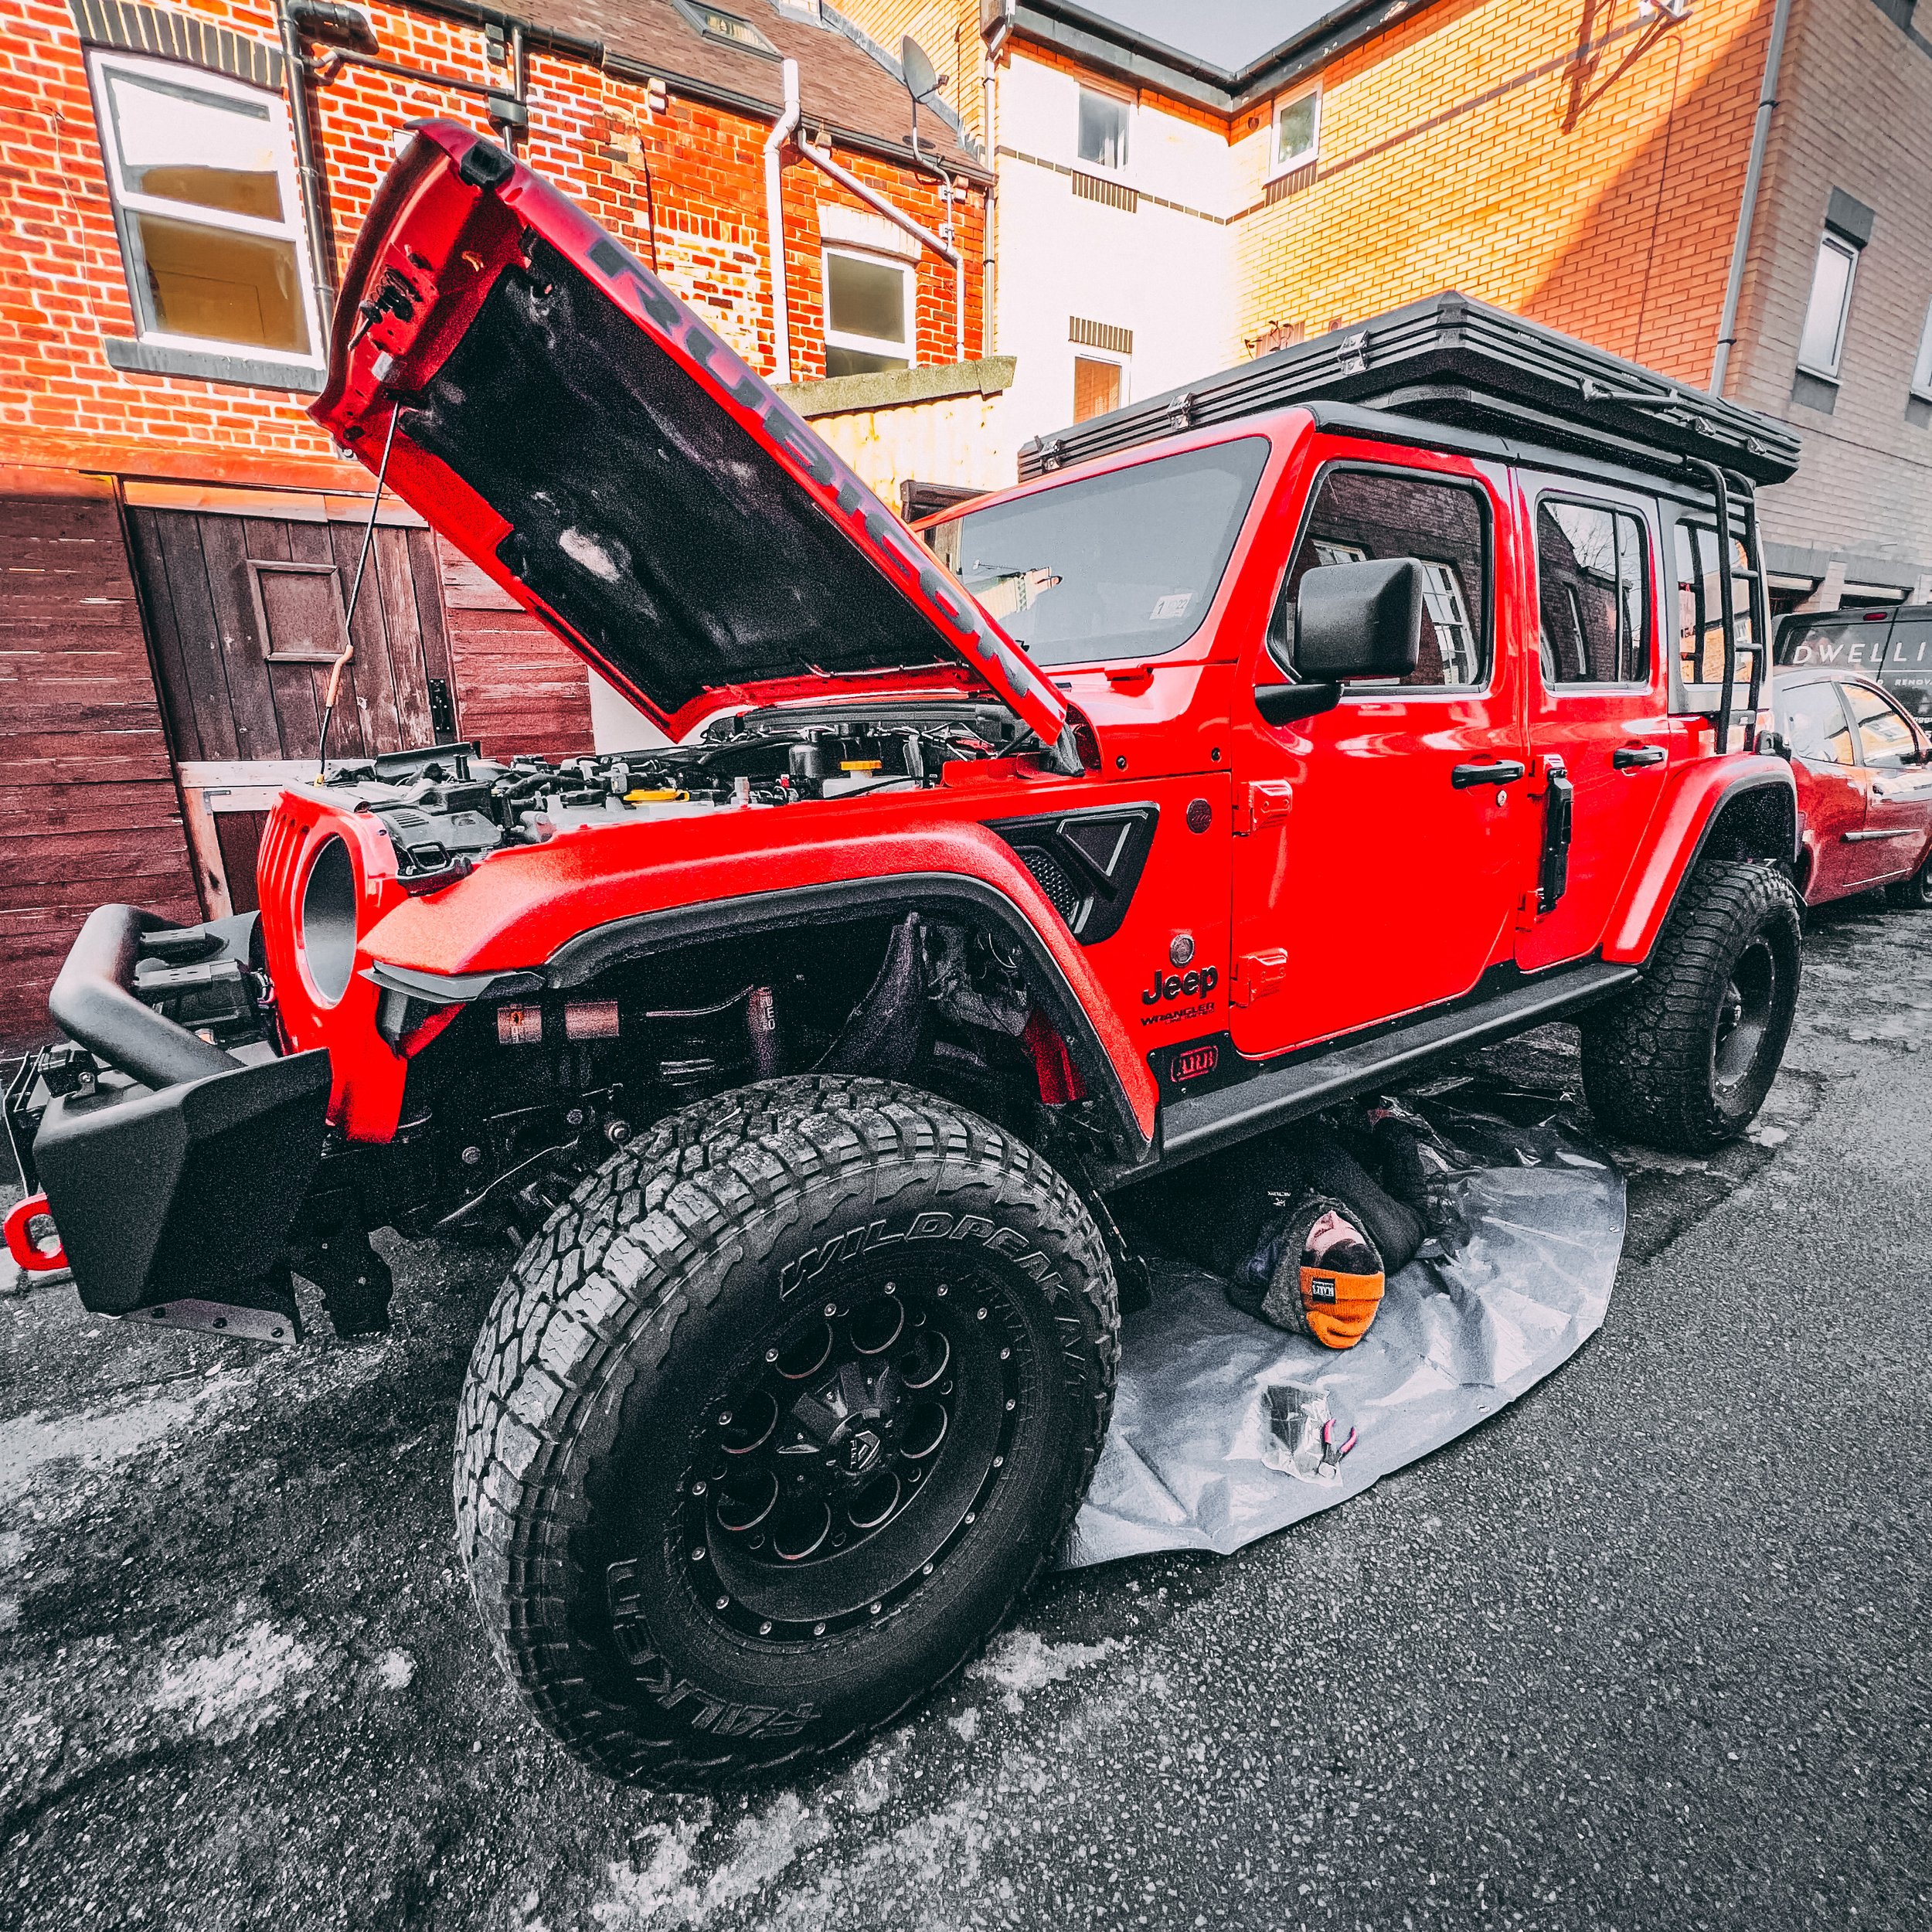
Installation of this kit is straight-forward enough, but it is time consuming. I had hoped to install these lights in the US while I still had access to all of my tools and driveway to work, but the lights were back ordered and I was only able to get them days before I left for the UK. The Jeep and all of my tools were long gone by then, so I had to do this installation with the most basic of hand tools while parked in a back alley. Everything I needed I carried in the Blue Ridge Overland Gear tool bag… I raise all of this to say that if you have the motivation, you can do this install even with the most basic gear.
Again, pairing this install with the previously mentioned side turn signals can save some time and effort so that you only pull back the inner fender liner once to access that turn signal wire.
Installation looks something like this:
Remove inner fender liners and access the turn signal wiring harness on both sides of the vehicle.
Install the included adapter in line of the turn signal wires. If you’re adding side markers, this is a good time to tap into that wire too.
Run the long back wire attached to each harness along the car to the back. Avoid anything that moves or gets hot. Zip tie the wire up out of the way. The wire will terminate in an access hole near where the rear shocks mount.
Rip up the entire trunk… literally. You need to tap into the 3rd brake light wiring harness in the tailgate and run a wire from the tailgate into each of your tail lights. This requires removal of all the trim and cargo area flooring. In our case, I had to remove the entire Goose Gear system.
Follow the instructions to wire your tail lights for “light hacker” mode.
Remove factory tail lights. Remove the blind spot radar system and install it into the new lights.
Connect the wires you ran from the front turn signals and the brake light wire to the new lights. Install and test.


The entire installation of these lights and the side marker lights took me about 9 hours. Again, I was working in less-than-ideal environment to do this (laying on a tarp and with no power tools) — so the lesson here would be to plan ahead and either do the modifications before you ship your vehicle, or have a shop do them for you if time is critical.
Parting Thoughts
The process of converting a car from US spec to meet European specifications is not trivial, but it’s also not impossible. The key is planning ahead. Generally speaking, you only have 30 days to get your car converted and tested after it is imported, so having the parts in hand and the tools needed to do the install when I arrived was critical. Had I planned even better, I would have had some of these modifications done before I shipped the car.
Although this blog documents my process for importing and modifying a car to meet UK requirements, do your own research too! Some of the requirements I am having to meet were only introduced in the last few years, so take this advise with a grain of salt.
Good luck!